
Welcome to Weather-Above


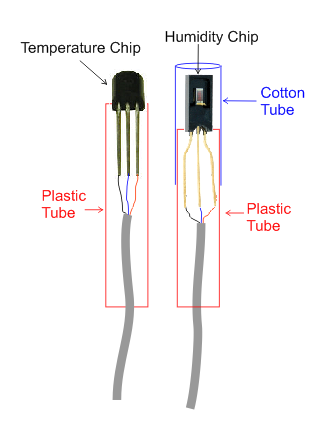
The first thing is to take a note of the position of the humidity chip, mark them on a piece of paper the corresponding pin outs and repeat for the temperature chip ,you need to remove both of the chips, I recommend leaving approximately 4 mm of the legs on the board this will make it easier to solder the connections, try not to touch the surface of the humidity chip make sure you leave enough of the legs on the components to solder to .You will need a small diameter rigid plastic pipe approximately 5 mm in diameter and 100 mm in length and a metre of audio 4-Core cable from Maplin Electronics catalogue reference number (XR92A) . Solder a piece of the cable to the temperature chip and a piece of cable to the humidity chip then thread the cable through the tube so the chip is at the top, use some hot melt glue to secure and seal the chip in position then repeat this for the humidity sensor, remember do not touch the surface of the humidity chip. Then you need to solder the cable onto the circuit board remember to solder them in the right position look at your notes to make sure they are correct. You'll need a cotton tube this needs to slide over the humidity chip and secure onto the plastic tube you can use a cotton shoelace find the right diameter shoelace cut the required length then boil in water for five minutes , put it somewhere to dry make sure it is 100% dry before fitting this over the humidity chip.
The response time has been incredible it has reached 100% humidity and climbed down with no errors the other important thing is to make sure you have a good air flow, I am using a small fan in a screen box and the air is drawn over the temperature and humidity sensor you do not want a huge airflow just a gentle movement of air this will give you some amazing results.


Cotton Tube
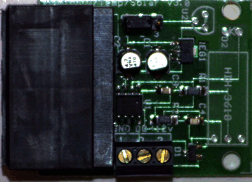
Hobby board
temperature/humidity
Temperature dry bulb & Humidity wet bulb electronic 1 wire Mod